Introduction
As the title suggests, my latest weekend project was a very exotic kind of robot: it was a vehicle based on the AVR Atmega microcontroller that can be controlled using voice recognition system of an Android phone. The project I made was simple, it only uses the basic functionality of the robot car: turn on, turn off, go forward, go backward, turn left and, you’ve guessed it, turn right. Nonetheless, I found the special pride and joy in embedding all the high-tech stuff in it: Android phone apps, voice recognition, and Bluetooth communication. The “system” uses Android voice recognition system to recognize your command (the thing you actually want to say to your car), which will be sent via Bluetooth to the Atmega μC, which will be used to move your car around. This is a prototype project only, so better watch out for the breakable things in your apartment and don’t bring it out on the open highway.
Electronics
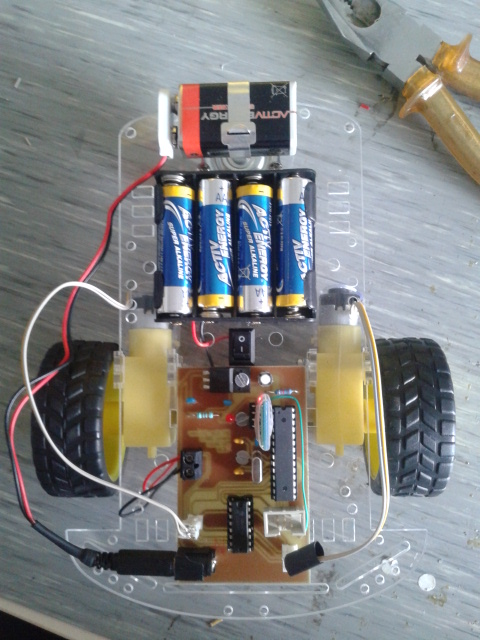
It all started with the skeleton – a robot car chassis from E-bay. It came in pieces, so I had to assemble it, just like the toy from Kinder Surprise. It has two low power DC motors HC02-48, and seller’s specifications were: reduction ratio: 1:48 (I’d be happy if someone in comments could tell what it means) and 44 rpm with the wheel on but “no lode” (what seller probably used wanting to say “no load”). To find best parameters, I tested with my lab equipment. It turned out to have best performance under the 6 V, consuming some 170 mA. So, to run it on the long terms I’d need a 4 times 1.5V battery with the capacity of few thousand mAh (2 x 170 x the-number-of-hours-you-want-it-to-work-without-changing-the-batteries). For the motor drive it would be better to buy a bit more expensive but reliable and long lasting batteries. To reduce power consumption, it would be best not to drive the motors to the max power all the time but instead use some PWM control, what is, luckily, easily done with Atmega controllers.
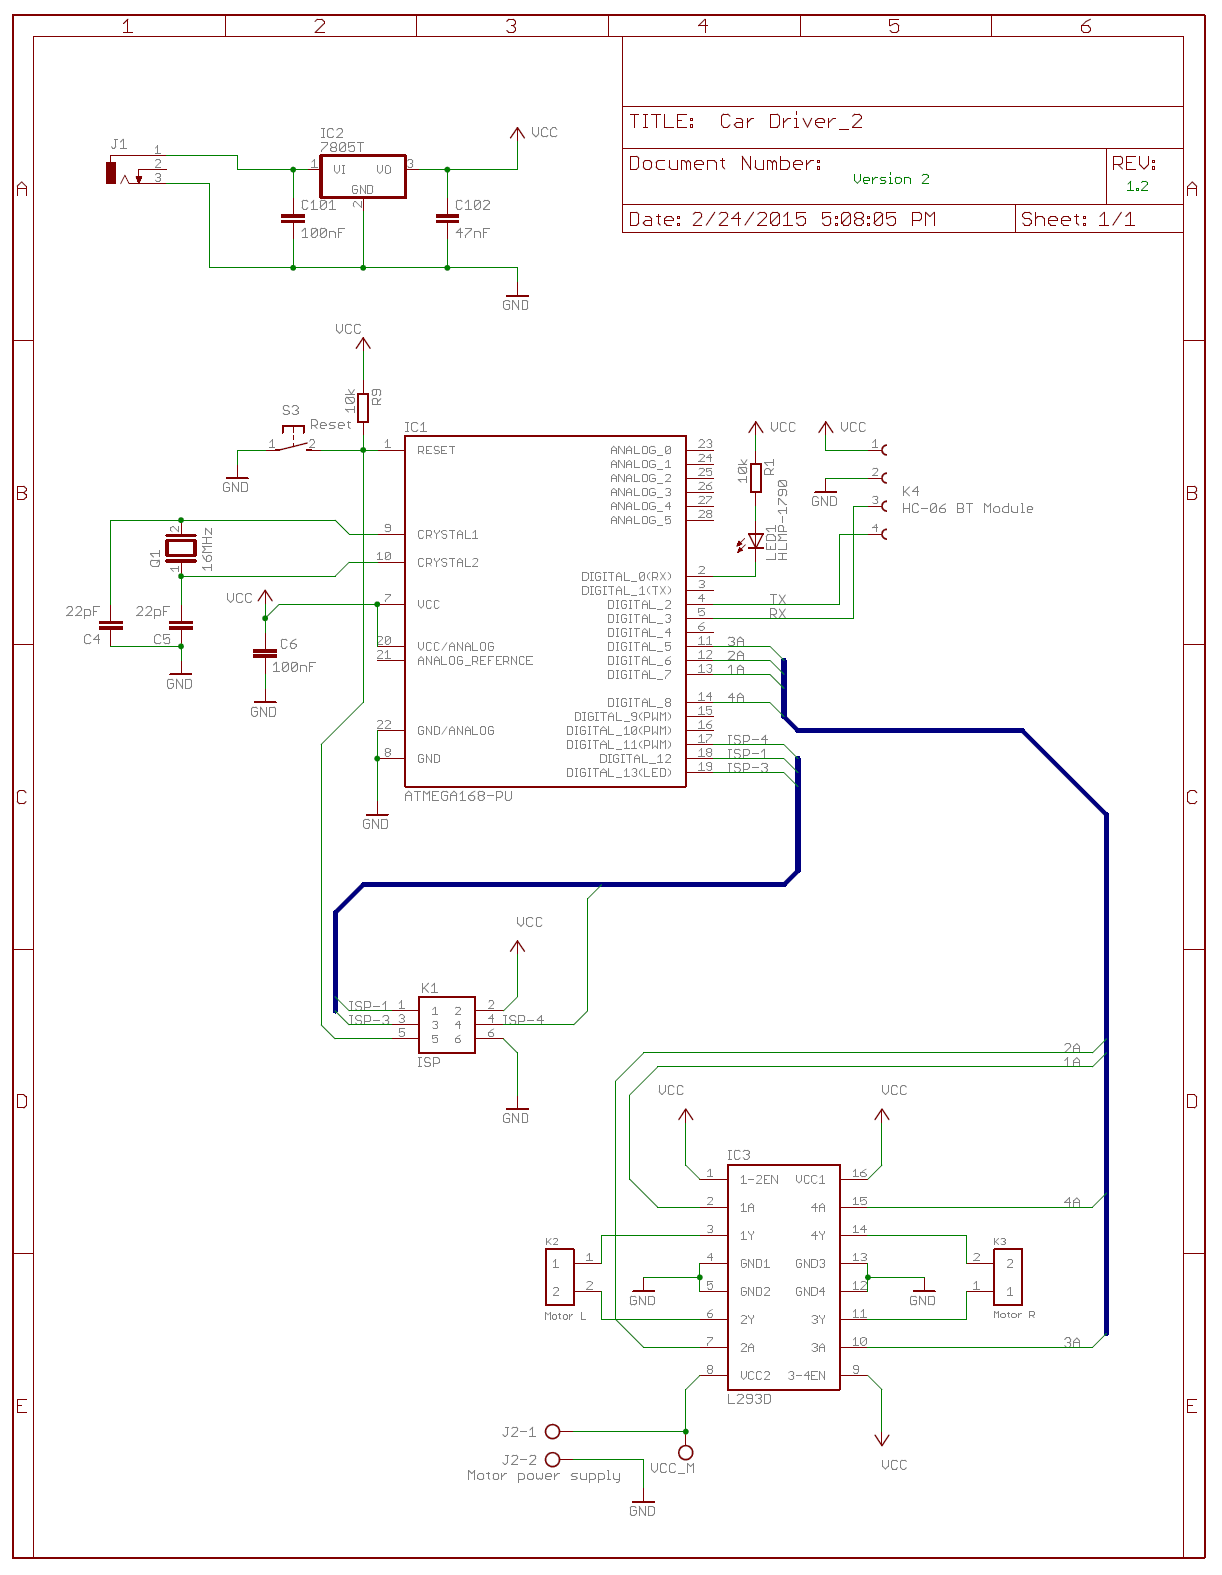
Control circuit is given in the schematic on the left. It is powered by 9V alkaline battery and voltage-regulated with 7805. The center piece is, of course, Atmega168 along with its 16 MHz quartz. But the most sophisticated piece of electronics is this pretty Bluetooth module HC-06, also fetched from E-bay. It only speaks universal serial, and luckily again, Atmega168 has no problems with it.
The motors are driven by the H-bridge, embedded in the L293D IC. H-bridge means that I can drive the motor in two ways, back and forward, by changing the direction of the current through it. L293 is very handy for this application cause it contains an amazing amount of 2 bridges, i.e. two motors can be controlled. Usually when you drive motors or some other inductive load, you would do it using transistor switch and diode across the motor to prevent overvoltage damage. L293D has the diodes internally embedded so there was no need for additional components (but be careful, L293-with-no-D, has no diodes and may cause destruction if you don’t put them). The L293 is simply controlled by the Atmega via its PWM enabled digital outputs.
Programming
This 6-pin connector I left on the schematics is for ISP – in-system-programming. It serves to write my programming code in the flash memory of the Atmega168. Now comes the funny part: instead of using standard programmers like AVRISP or USBtiny, I used my Arduino Duelmillanove board! How did I do it is explained here, where I already wrote about possibilities of using the Arduino as a μC programmer. Why would I do such a pervert deed? The thing is, I can develop my software in very popular and easy to use Arduino IDE and upload it on Atmega168 with no troubles at all! And by “no troubles at all” I mean “a lot of troubles all the time” :). But don’t let that discourage you, in the end it works!
The code contains of simple lineflow: initialization, wait for the message from serial port (where Bluetooth module sits), check what BT module has to say, and use it to drive the car. If the message was “go”, turn the both wheels in the same direction. If the message is “stop”, turn them off, and so on, you’ve got the logic. In order to save some battery’s life and finely control the speed of the car I used pulse-width modulation (PWM) to drive the motor. Atmega microcontrollers enable this feature on their digital general purpose digital ports (check the datasheet), and Arduino has it implemented with analogWrite(pin, value) function. The value part goes from 0, what means that duty cycle is 0% to 255, where duty cycle is 100%. For moderate speed and energy savings, I empirically found the best value = 90. I also included a “fast” mode, where the value = 250. The full code is here:
/* Code by Pero K.
1.3.2014

Serial connection of Bluetooth module HC-06 with Atmega168 and PWN motor control. HC-06 communicates with
the Android voice recognition application and sends the received data to the Arduino. The data is than used to turn on/off/left/right/fast the robot car. The motor is driven with the L293DNE (double H-bridge). */

#include
#include

// HC-06 Serial Setup
#define rxBT 3
#define txBT 2

// LED diode
#define led 0

// Motor control digital pins
#define left_wheel_FWD 5
#define right_wheel_FWD 6
#define left_wheel_BCK 8
#define right_wheel_BCK 7

// Bluetooth serial protocol class
SoftwareSerial serialBT = SoftwareSerial(rxBT, txBT);

String command = "";

void setup() {
  pinMode(rxBT, INPUT);
  pinMode(txBT, OUTPUT);

  pinMode(led, OUTPUT);

  pinMode(left_wheel_FWD, OUTPUT);
  pinMode(right_wheel_FWD, OUTPUT);
  pinMode(left_wheel_BCK, OUTPUT);
  pinMode(right_wheel_BCK, OUTPUT);

  serialBT.begin(9600);
}

void loop() {
  command = Bluetooth();
  if(command == "go")
       car_go();
  else if(command == "stop")
       car_stop();
  else if(command == "fast")
       car_fast();
  else if(command == "back")
       car_back();
  else if(command == "left")
       car_left();
  else if(command == "right")
       car_right();
  else
       ;
}

void car_go(){

  analogWrite(left_wheel_FWD, 90);    //  Normal speed - half output
  analogWrite(right_wheel_FWD, 90);
  digitalWrite(left_wheel_BCK, LOW);
  digitalWrite(right_wheel_BCK, LOW);
  digitalWrite(led, LOW);
}

void car_fast(){

  analogWrite(left_wheel_FWD, 250);    // Higher speed - full output
  analogWrite(right_wheel_FWD, 250);
  digitalWrite(left_wheel_BCK, LOW);
  digitalWrite(right_wheel_BCK, LOW);
  digitalWrite(led, LOW);
}

void car_stop(){

  digitalWrite(led, HIGH);
  digitalWrite(left_wheel_FWD, LOW);            // turn all off
  digitalWrite(right_wheel_FWD, LOW);
  digitalWrite(left_wheel_BCK, LOW);
  digitalWrite(right_wheel_BCK, LOW);
}

void car_back(){

  analogWrite(left_wheel_FWD, 0);     // reverse the polarity on the DC motors
  analogWrite(right_wheel_FWD, 0);
  digitalWrite(left_wheel_BCK, HIGH);
  digitalWrite(right_wheel_BCK, HIGH);
  delay(2000);                       // drive back only for two seconds
  digitalWrite(left_wheel_BCK, LOW);  // then stop
  digitalWrite(right_wheel_BCK, LOW);
}

void car_left(){

  analogWrite(right_wheel_FWD, 0); // turn off the right wheel
  digitalWrite(right_wheel_BCK, LOW);
  digitalWrite(left_wheel_BCK, LOW);

  analogWrite(left_wheel_FWD, 80);  // keep the left one on for the 1 sec
  delay(1000);
  analogWrite(left_wheel_FWD, 0);
}

void car_right(){

  analogWrite(left_wheel_FWD, 0); // turn off the left wheel
  digitalWrite(right_wheel_BCK, LOW);
  digitalWrite(left_wheel_BCK, LOW);

  analogWrite(right_wheel_FWD, 80);  // keep the right one on for the 1 sec
  delay(1000);
  analogWrite(right_wheel_FWD, 0);
}

String Bluetooth()
{
    String voice = "";
    char c = '0';
    while (serialBT.available() && c != '#') { //Check if there is an available byte to read, and if it is end of the command
      delay(10);                              //Delay added to make thing stable
      c = serialBT.read();                    //Read the data from serial port
      voice += c;
   }
   if (voice.length() > 0) {
      String command = voice.substring(1, voice.length()-1);
      voice = "";  //Reset the variable after initiating
      c = '0';
      return(command);
   }
   else
     return("");
}
Bluetooth app
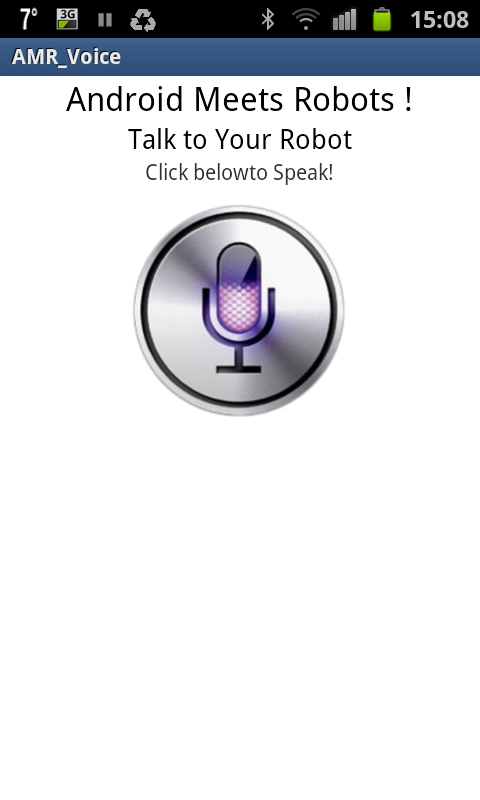
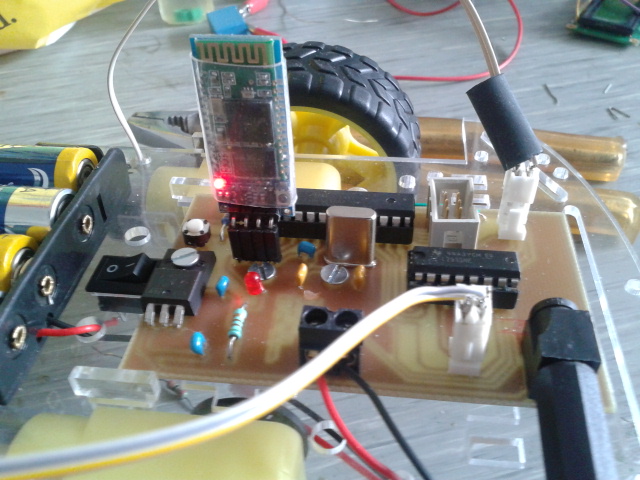
Ok, now that you have built the circuit, programmed the microcontroller, it’s time to make it talk to your smartphone. Do do that you can refer to my older post on connecting Bluetooth module HC-06 with the Arduino and sending the voice commands here. Download the app AMR_Voice, turn the Bluetooth reception on your phone and make sure it is connected to the Internet. Before you start talking to the app, connect the phone with the HC-06: you’ll know it’s connected if the red LED on HC-06 has stopped blinking. Steer the vehicle by clearly saying the commands: go, stop (don’t make it sound like stahp, rather emphasize this “o”, like in stohp), back (it works better if you say something like baeck), fast, left or right. I strongly encourage you to be creative and invent (and embed) some new commands like in e. roll over, jump, play dead, etc.
What’s next?
Although the robot does exactly what has been planed, I am not very happy with the general motion of the car. When in go-forward mode, the car doesn’t keep the straight line in motion – it steers a bit left or right. I am still not sure whether is this because in my code left motor turns on a fraction of a second before the later than one or because the two motors do not behave the same. However, some automatic control needs to be embedded to ensure smooth ride along the straight line. I was thinking of building-in an ADXL3 accelerometer that will serve as a feedback in the direction guidance, so in one of the next posts I’ll try to cover how it turned out.
